
CPU Overload in Cubase? Use Freeze, Render & Bounce to Commit
If your Cubase session looks “fine” on paper (good computer, decent buffer), but playback starts to crawl, it’s usually not one magical plugin that’s killing your system.
It’s the workflow mistake most of us do without thinking: we keep everything live forever.
Virtual instruments stay active. Big plugin chains stay active. Comped vocals are still made of a million tiny slices. Edited drums are a puzzle of cuts and crossfades.
At some point, Cubase has to juggle all of that in real time… and it starts to die on you.
The fix is simple: you need to commit. The smart way.
The 3 Cubase “Commit” Tools (And Why They’re Not The Same)
Cubase gives us three tools that all help performance, but each one is made for a different moment:
- Freeze (temporary + reversible)
- Render In Place (print and move on)
- Bounce Selection (consolidate edits into one clean file)
1) Freeze: The “CPU on Vacation” Move
I don’t freeze everything. Freeze is for situations where you want relief right now, but you’re not ready to fully print and delete anything.
When Freeze is perfect
- You’re “done enough” with a virtual instrument for now
- Your CPU is getting maxed out and you need breathing room
- You want something reversible (edit later, then refreeze)
What Freeze actually does
Freeze creates an audio file so Cubase can play it back without doing the full real-time processing. Your MIDI and the track settings become locked until you unfreeze.
Key Freeze settings to pay attention to
- Include inserts: freezes the instrument plus its insert plugins
- Tail size: add seconds if the sound rings out (synth sustain, reverb, amp tails)
- Unload instrument (optional): can free even more resources depending on your choice
Important limitation
You can freeze audio tracks and virtual instruments, but not group channels or FX channels.
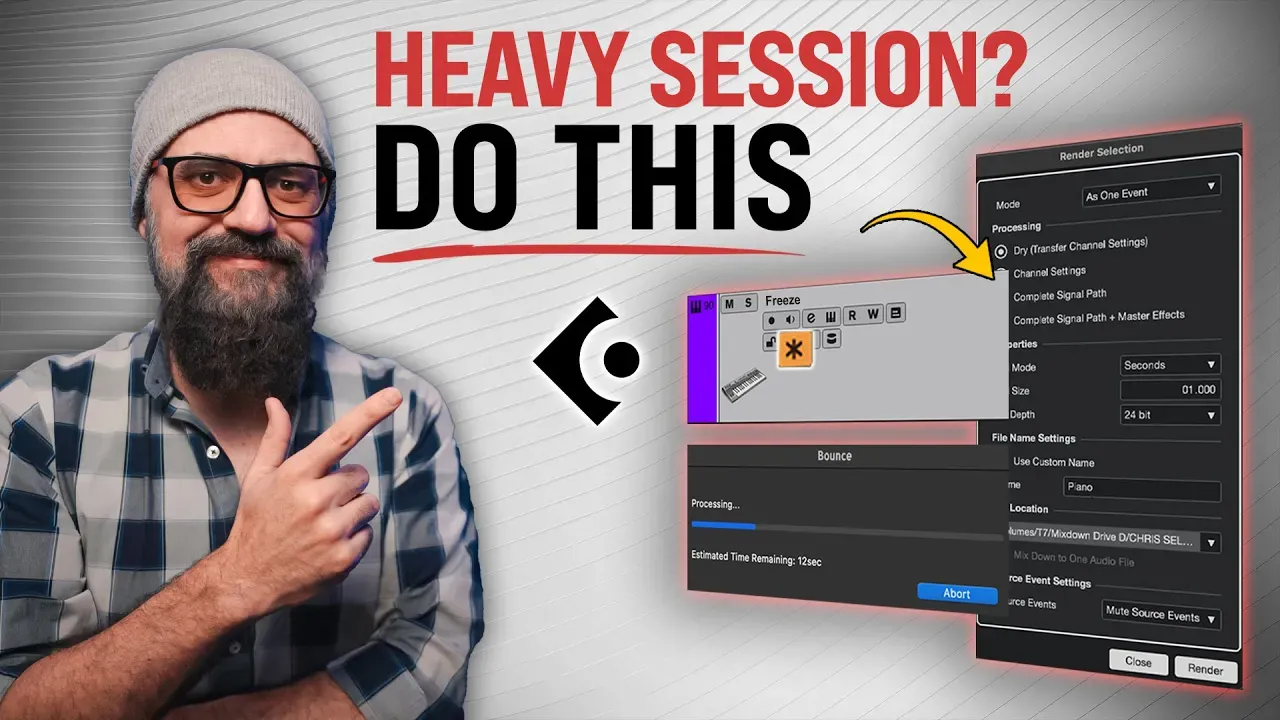
2) Render In Place: The “I’m Committing For Real” Move
When it’s time to actually commit and prepare a session for mixing, Render In Place is the better tool.
This is one of the biggest mix-prep habits you can build: print your virtual instruments to audio before you start mixing.
Why Render In Place is so useful
- You print the performance into audio so mixing is lighter and faster
- You can choose exactly what gets printed (dry vs processed)
- You stop dragging “live” instruments through the whole mix phase
Render options (simple breakdown)
- Dry: prints only the instrument output (no insert chain)
- Channel Settings: includes inserts + channel strip settings
- Complete Signal Path: includes sends too
- Complete Signal Path + Master FX: prints absolutely everything (even mix bus processing)
The real “commit” step most people skip
Once you render and you know you’re done, delete the original instrument track. That’s the whole point. Printing without cleaning up is only half committing.
Two real-world uses where Render In Place shines
- Drum sample replacement: once your trigger plugin is giving you the kick (or snare) you want, render it and ditch the plugin.
- Analog gear printing: if you’re running audio through hardware, render it so you can move that gear to another track. (Note: this will render in real time.)
3) Bounce Selection: The “Clean Up Your Edits” Move
This one is massive, especially for vocals and drums.
When you comp vocals, you don’t end up with “one vocal.” You end up with tons of tiny events, crossfades, and slices.
Cubase has to calculate and play all of that. And when your session is big, it adds up.
My bounce workflow (safe and fast)
- Make a backup using Track Versions (duplicate it and name it “Backup”).
- Select the whole comped part.
- Go to Audio > Bounce Selection and choose Replace.
Now you’ve got one clean file on the track. Less juggling. Smoother playback. Easier session management.
Where Bounce Selection helps the most
- Vocal comps (lots of slices and fades)
- Edited drums (even worse because it’s across many channels)
- After VariAudio / pitch edits
- After AudioWarp / timing edits
Pro tip: assign a shortcut
If you use Bounce Selection constantly, put it on a key command. It turns this into a “one-second cleanup move.”
Bonus use: committing Direct Offline Processing (DOP)
DOP processes the event itself (not the track inserts). If you apply a DOP effect and you like it, Bounce Selection lets you commit it right away into a new file.
Also important: if you duplicated a track and both tracks share the same source file, bouncing one of them creates a new file so changes won’t affect the other.
Freeze vs Render In Place vs Bounce Selection (Quick Decision Guide)
- Freeze when you want temporary CPU relief but might still edit later.
- Render In Place when you’re ready to print and move into mixing (or remove a plugin from the workflow).
- Bounce Selection when your edits are messy and you want one clean file for smoother playback.
➜ Want The Full Walkthrough?
If you want to see these three tools in action inside a real Cubase session (and exactly how I use them), go watch the video here:
